Can RF roof fans also be controlled by frequency inverters?
Can RF roof fans also be controlled by frequency inverters?
Yes, of course they can. Output of the new RF roof fan line can be controlled by the Vacon 10 frequency inverters. Wiring diagrams can be found in the current version of the Installation Manual. To set the frequency inverter parameters, perform the following procedure.
Setting the Vacon 10 frequency inverter
Four output lines of the Vacon 10 frequency inverters are used to control RF … roof fans. The motor parameter set-up, preset in the frequency inverter, is always set at the factory to the lowest output of the roof fan in the given output line. Before starting the roof fan, it is necessary to check whether the motor parameters included in table #1 correspond to the frequency inverter parameter set-up.
The following parameters must be checked:
- Rated speed – parameter number 1.3
- Motor current – parameter number 1.4
- Current overload – parameter number 1.7
Control Panel Description:
Display Description:
The actual operating mode of the frequency inverter is indicated by the arrows on the upper line of the display:
READY RUN STOP ALARM FAULT
The direction of rotation and the manner of control are indicated by the arrows on the lower line of the display:
FWD REV I/O KEYPAD BUS
The arrow on the left side of the display shows the selected parameter set-up:
REF MON PAR FLT
Control Buttons:
(1) Navigation and control button:
Parameter set-up and change
(2) START button:
Starts the motor and enables control of the frequency inverter from its panel (in Remak parameterization configuration, this button is blocked)
(3) STOP button:
Stops the motor

Parameter Check and Change Procedure:
-
The frequency inverter must be connected to the supply voltage
- display backlight is on
- STOP active mode -
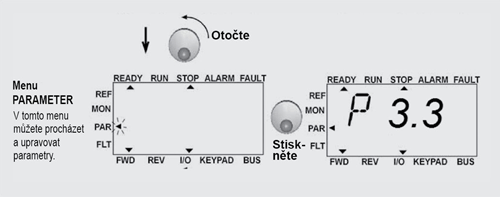
Turn the navigation button until the arrow on the left side of the display flashes against the "PAR" sign and press the navigation button, see figure

-
Turning the button, select in sequence parameters P1.3, P1.4 and P1.7 and compare the values of these data points with table.
-
If all parameter values correspond to the data in table, press the navigation button 2x to return to the monitoring mode.
-
Otherwise, if the parameter values do not correspond to the data in table, change the parameter values following the description below
-
Display parameter P1.3 and press the control button, the displayed parameter will start to flash, set the required value in accordance with table using the control button and confirm the change in the parameter setting by pressing the control button.
Repeat this procedure and set the values of parameters 1.4 and 1.7. To return to the basic/monitoring mode, press the navigation button 2x.
Setting the frequency inverter for analogue control
Frequency inverter default settings are configured for control by giving commands using digital outputs; this enables the device to be connected to the VCB control unit, or to be controlled using the ORe5 remote controller. To connect the frequency inverter to WBC control units, or to control it using analogue signal (AI) 0 - 10V, it is necessary to change the setting of parameter 3.3. Parameter 3.3 default setting - "0", for analogue devices, change to "1":
Výchozí přednastavení parametru 3.3 - “ 0 “ pro řízení AI změna parametru na “1“:
- Turn the navigation button until the arrow on the left side of the display flashes against the "PAR" sign and press the navigation button, see figure:

- Turning the button, select parameter P3.3 and press the control button, the displayed parameter will start to flash; using the control button, set the parameter to "1" and confirm by pressing the control button.
- To return to the basic/monitoring mode, press the control button 2x.
For a detailed description of the frequency inverter settings descriptions, refer to the Vacon 10 Manual.
The above-mentioned procedure has also been included in the current version of the Installation Manual.

